

ShmooCon 2008 Badge Puzzle


Badge 6
I’ve been having a great time solving puzzles at security conferences. I think the first significant puzzle I’d seen was at ShmooCon 4, in 2008, but I didn’t even try to solve that, partially because the bug hadn’t yet bitten me, and partially because I didn’t have any computer with me at the time. So now, four years later, I figured it was time to finally complete this puzzle. They gave a rough outline of the solution at the closing ceremony, but for this puzzle the challenge was less of a mystery than an implementation problem.
As always, if you’d like to try to solve this yourself, then STOP now, as the rest of this post is full of spoilers. If you’d like a copy of just the raw data (a file containing an ASCII representation of all the badge data), click here: ShmooCon 2008 Badge Text.
The puzzle was entirely contained on the badges for the conference – 16 different plastic badges, each with a different pattern of dots. Clearly, these were meant to look like punched cards, though apparently many of the attendees at the conference didn’t recognize them as such. Each card had 30 columns along the long edge of the badge, and 12 rows across the short edge. Generally, punched cards were “read” horizontally, but since the badge included a “ShmooCon 4” logo that needed to be read vertically, that’s how I’ll discuss the cards here. Plus, it’s a lot easier to analyze that way.
Each row (I’ve rotated them, remember?) is therefore a 12-bit word. But which side is the high bit? A little experimentation and analysis of all the cards shows that many cards included “punches” only on the right half of the card. If one interprets those bits as the lowermost 6 bits in the word, then those pretty clearly represent ASCII letters. So it seems that the high bit is on the left (column 0) and least significant bit on the right (bit 11).
This is nice, ‘cause that’s also how most people tend to visualize bits in a word.
But two questions remain:
- How do we put the badges in the right order?
- What does the non-ASCII code mean?
To put the badges in the right order, the puzzle creators included an extra hint: a series of solid and broken lines at the top of the badge. These represented hexagrams from the I Ching: using the classical King Wen sequence, the badges can easily be placed into the correct order.
The other question is a little more difficult. I couldn’t find an example of this kind of punched card online, and even if I could, the same kinds of cards were frequently used for many different systems. According to the presentation in the closing ceremony, they provided a few hints during the con. One of these told players to think about a “12-bit computer from 1967” and an admonition to “Please Don’t Participate” in the puzzle. These were meant to lead us to the PDP-8 minicomputer.
When working with these cards, it’s important to remember that octal, rather than hexadecimal, was generally used when dealing with the PDP-8, as the 12-bit word is exactly 3 octal digits. So, let’s take the punched cards and figure out what the octal (and, when appropriate, ASCII) values are for each row.
Here’s what the first card in the sequence starts with:
Punches      Octal  ASCII
.....*..**..  0114   L
.....*...*..  0104   D
......*.....  0040
......**..*.  0062   2
......**..*.  0062   2
......*.....  0040
.....*...***  0107   G
.....*..****  0117   O
......*.....  0040
......**.***  0067   7
......**.*.*  0065   5
......*.....  0040

[.....]
First, I had to find a PDP-8 emulator, and that was troublesome. Eventually, I found one that seemed to run, and seemed to be able to load the data in a format I could readily produce. And, fortunately, it also seemed to be the one they used in the slides in the closing ceremony.
The program, PDP8, was written by Brian Shelburne at Wittenberg university, and while not quite as flashy as some emulators, had the advantage that it worked out of the box. The disadvantage is I had to run it in VMware – a Mac running a Windows emulator running a PDP emulator. Inception, indeed.
Tougher than finding the emulator, though, was figuring out how to get the code loaded up. The different emulators I tried support several object data formats, including several emulated disk and paper tape files, but none of them seemed to work for me. In the end, it turned out that I needed a flat ASCII file formatted like this:
0000/0114
0000/0104
0000/0040
....
The first word (in octal) gave the memory address into which the second word is to be loaded. But even this didn’t work for a long while, until I realized that the emulator needed the text file in “DOS” mode – with CR/LF for each line ending, instead of the LF-only ending used in UNIX. Once I passed that obstacle, I was able to easily load the data into the emulator. But it still woudln’t work.
The first words on the first card, “LD 22 GO 75” seems to be directed at the player, not at a computer. I interpreted this as “load from word 22 and begin execution at word 75” – meaning skip the first 21 words and begin loading the program from the 22nd word. But several questions remained: Are 22 and 75 in decimal, or binary? Is the 75 before or after you remove the leading 22 words?
After a long while, I looked back at the closing ceremony video, and saw a bunch of what looked like null words at the top of the debug screen (they were hard to read, but looked like they were probalby all 0s). Counting blocks, I saw 18, which, in octal, is 22. So I had it backwards – I had to load the entire data stream, but load it into memory beginning at location 22, instead of starting at zero.
So once I’d worked out the file format and where to load the data, I typed “g 75” and the program ran:
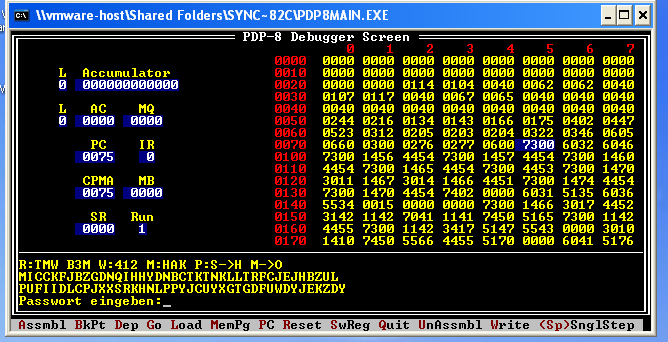
R:TMW B3M W:412 M:HAK P: S->H M->O
MICCKFJBZGDNQIHHYDNBCTKTNKLLTRFCJEJHBZUL
PUFIIDLCPJXXSRKHNLPPYJCUYXGTGDFUWDYJEKZDY
Passwort eingeben:
This is pretty clearly settings for an Enigma machine (the German password prompt was kind of a hint as well). Wheels 4, 1, and 2, in that order. Ring settings for the wheels at T, M, and W. Stecker connecting S to H and M to O, and finally, set the rotors to HAK. Once all that is set up, type in the ciphertext (MICCKF…) and you get:
xSOUTHxOFxNORWAYxNORTHxOFxMADAGASCARxEASTx
OFxKYRGYZSTANxWESTxOFxBULGARIAxILITAHSx
So now I’m looking for somethig in some vaguely-defined region in Europe. Of course, there’s one problem: there’s an awful lot of planet that’s both east of Kyrgyzstan and west of Bulgaria. It seems that this is a hint, to read the last word backwards: “ILITAHS” backwards is “SHATILI,” which is a city in Georgia. Entering “Georgia” as the password in the emulator decrypts the final ciphertext and provides the answer:
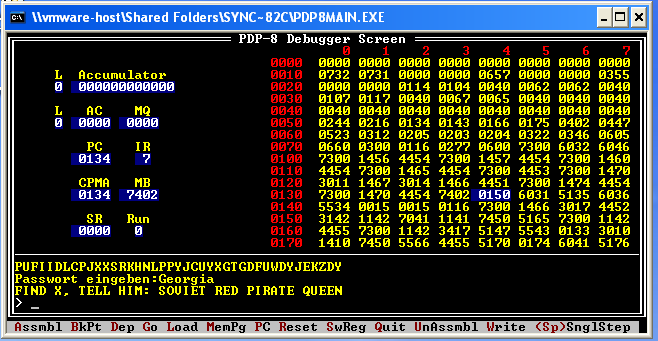
FIND X, TELL HIM: SOVIET RED PIRATE QUEEN
I sent that message off to Adam Cecchetti, the principal creator of the puzzle, and he confirmed that this was the right answer. He also confirmed that, as far as he knew, I was the first person (outside of the beta testing) to finish the puzzle. Of course, most people have probably forgotten about the puzzle at this point, anyway…
The hardest part of all this was the PDP-8 emulator: both finding one, and getting the code to properly load and execute. Interestingly, it is possible to solve this without ever actually needing the emulator.
PDP-8 operations use the three highest bits to define the operation code, and the lower 7 bits for data and for memory addressing. Stretches of code that contain just ASCII data, then, have those top three bits set to 0 and are therefore fairly easy to detect, especially when looking at punched cards. There are 5 blocks of ASCII data:
LD 22 GO 75

R1JND43L?

Passwort eingeben:

R:TMW B3M W:412 M:HAK P: S->H M->O
MICCKFJBZGDNQIHHYDNBCTKTNKLLTRFCJEJHBZUL
PUFIIDLCPJXXSRKHNLPPYJCUYXGTGDFUWDYJEKZDY

^A,!6G1Mg1*>+I)^N(UR4&7^N;R5,%g5& &=$g4:7"'

HHello World
The first indicated where to load the data in the emulator, the next two blocks are easy to recognize as leading to the Enigma machine, and once one decrypts that, the final key Georgia is found as before. But what to do with it? The last block (Hello World) is an easter egg (a snippet of code just prior to the string actually prints the mssage out). It seems likely, then, that the fifth block (^A,!6G1M…) is a ciphertext. Performing an XOR operation against that string using Georgia as the key produces the final phrase, without ever needing the emulator.
Interestingly, not only was there an easter egg at the end, but a subtle joke embedded in the code. The string “R1JND43L?” was, according to Adam, a reference to earlier plans for the puzzle: They’d first planned to encrypt the final clue with AES (originally named “Rijndael”), then swithced to Lucifer, the precursor to DES. Finally, they simply used XOR.
In the end, this was a fun puzzle, though I have to admit that I’ve criticized it over the last few years. Reliance on a PDP emulator makes for a tough puzzle to solve, and I do prefer those puzzles which can be solved with paper and pencil alone. However, as I mentioned, this can be solved without the emulator, though it requires guesswork and a little luck. Of course, if one were to recognize the code as from a PDP-8, it’s a short enough program that it can easily be figured out just by reading the disassembled instructions.
Either way, I’m glad I finally took the time to finish the puzzle, and wish I’d tried this long ago. Complexity aside, it’s quite an interesting challenge, and I really enjoyed trying to figure out how the PDP-8 instructions worked. (I’d been fortunate enough to do some assembly on a Sperry/Unisys mainframe in college, and this brought back some fun memories).
Thanks especially to Adam Cecchetti (responsible for the PDP-8 code and co-designer of the puzzle), 3ric Jhanson (co-designer), and Aether (badge design), for a great challenge, and my apologies to all for taking four whole years to finish it.
[When trying to finish this, I half-disassembled the code using a script and a whole lot of referring back to Wikipedia. Adam was kind enough to send along a copy of his original source, and I’ve used that as an additional check / reference, and produced a detailed, annotated copy of the badge data. It’s not really meant to be used as a source for an assembler, but instead lets you see what every row on every badge is, both code and data blocks. Click here to download a copy.]
(view Archived Comments from the old site)