1Password - MUKing about on the Mac
I’m taking a detailed look at how 1Password works, originally to help examine potential risks when used in a corporate environment, and eventually because I’m just a nerd and love All Things Crypto. (See this page for an introduction and background).
We’ll start out by looking into how you unlock the client on macOS.
Introduction – Using 1Password on macOS
Let’s say you’ve been a long-time 1Password user. You have a couple of local vaults that sync over Dropbox between your Mac and iPhone. Then you open a Family account, and share a few vaults with your spouse. And then you join a company that uses 1Password internally, and now you’ve suddenly got three accounts – local, family, and work.
But amazingly, you can access everything using just the same password you set 5 years ago. How the hell does that work?
Let’s focus just on the cloud-offerings (I’ll talk about local vaults later). This is where 1Password is trying to move towards in the long run, offers the most features (for multi-user collaboration), and is also the “scariest” prospect. I mean, a decade ago, if someone had said “We’re going to put all our passwords in the cloud and access them through a browser!”, you’d’ve thought they were crazy. Yet that’s exactly what many people do with 1Password.
Setting up an account
I’m not going to explain how an account is created (on the 1Password servers). We’ll just assume you’ve already got one. Once it’s been created, you can use it with all manner of local clients. Here’s a rough outline of what happens when you enable an account for a local client:
- First, enter your Secret Key, email address, a “server address” (like “myteam.1password.com”) and your Master Password
- The client reaches out to 1Password with your email and server address (and possibly a fragment of the secret key that identifies the account)
- It gets a special remote login salt from the server, then performs a bunch of cryptographic calculations
- Uses the result of those calculations to authenticate to the server
- Finally, the client pulls down your encrypted vaults and unlocks them
I’m not going to go into detail on the network-level traffic, but needed to get some of it out of the way to begin the real discussion. So let’s take it on faith that the above has happened, and now you’ve got one or more 1Password accounts configured on your local box. How do you unlock them?
MUKing About
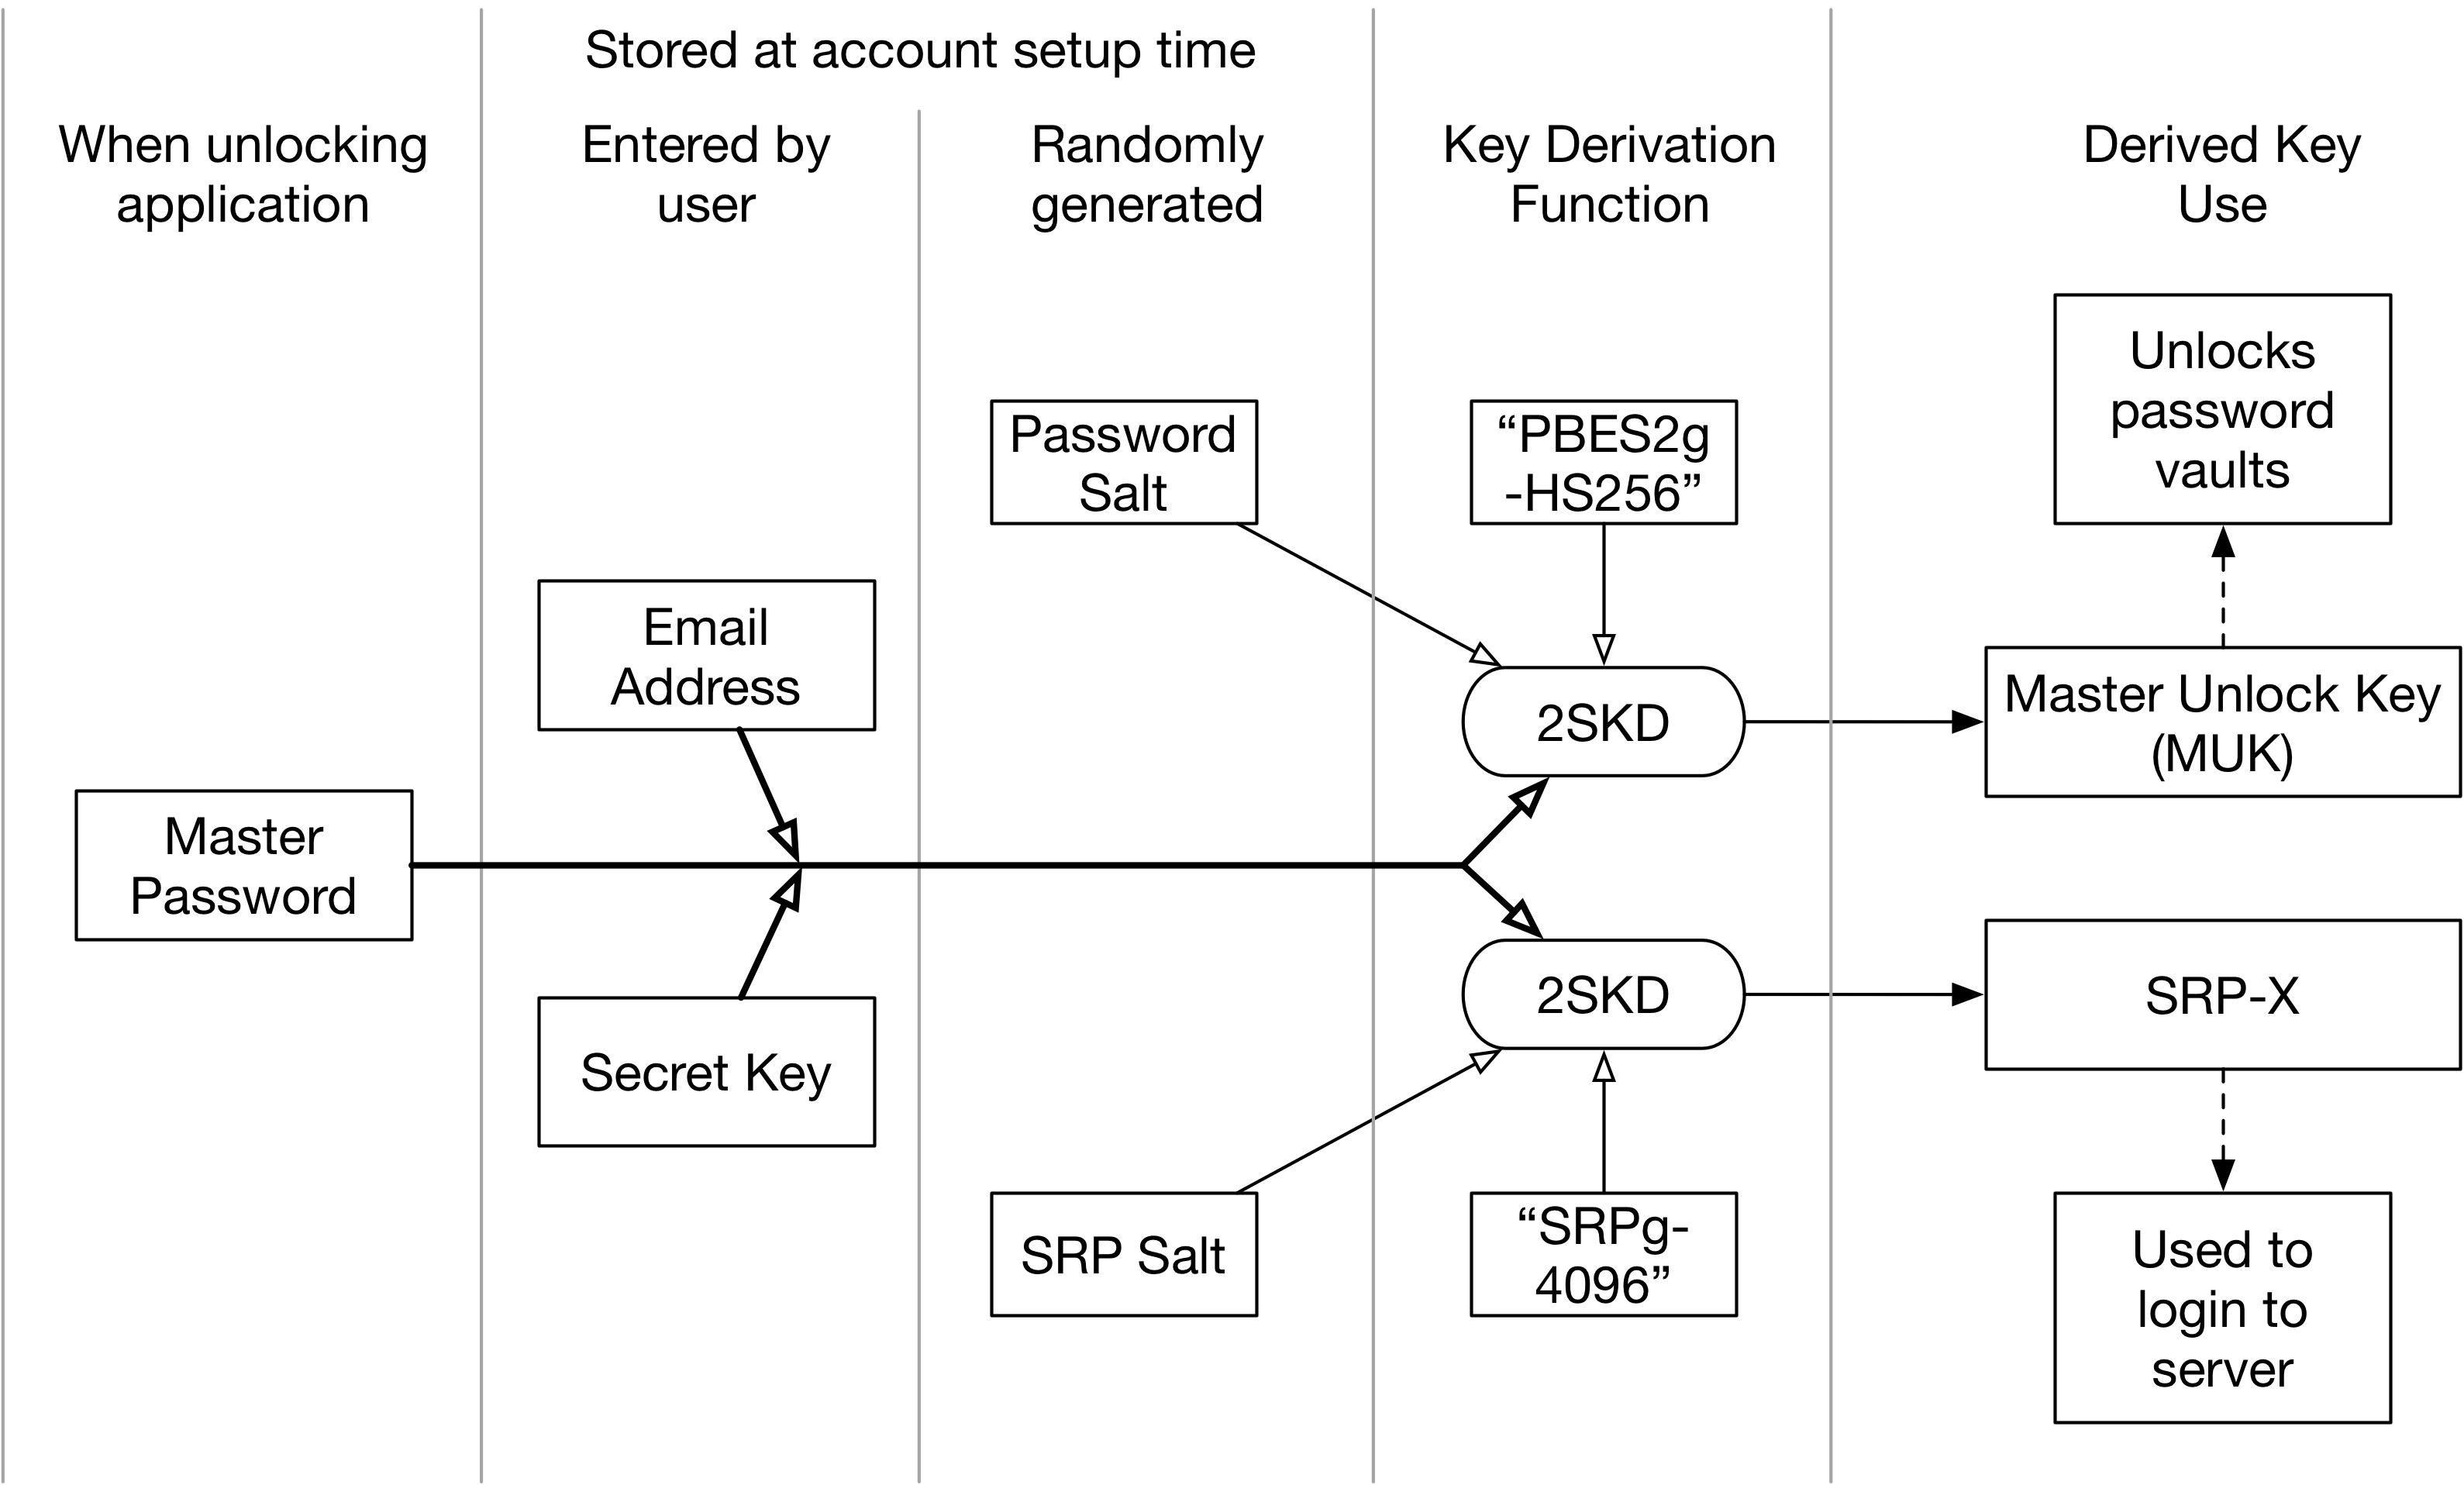
The heart of 1Password’s encryption system is what they call the “Two Secret Key Derivation” process, or “2KSD.” This process takes two secrets (obviously) – your Secret Key and your Master Password – and derives two cryptographically strong keys. The first of these keys is the “Master Unlock Key” or MUK, and it’s used for decrypting the actual password data. The second is the “SRP-X” authenticator, used to connect to the cloud servers using the Secure Remote Password protocol.
The 2KSD system has three stages:
- Build a salt
- Derive a key from the Master Password
- Mix in the Secret Key
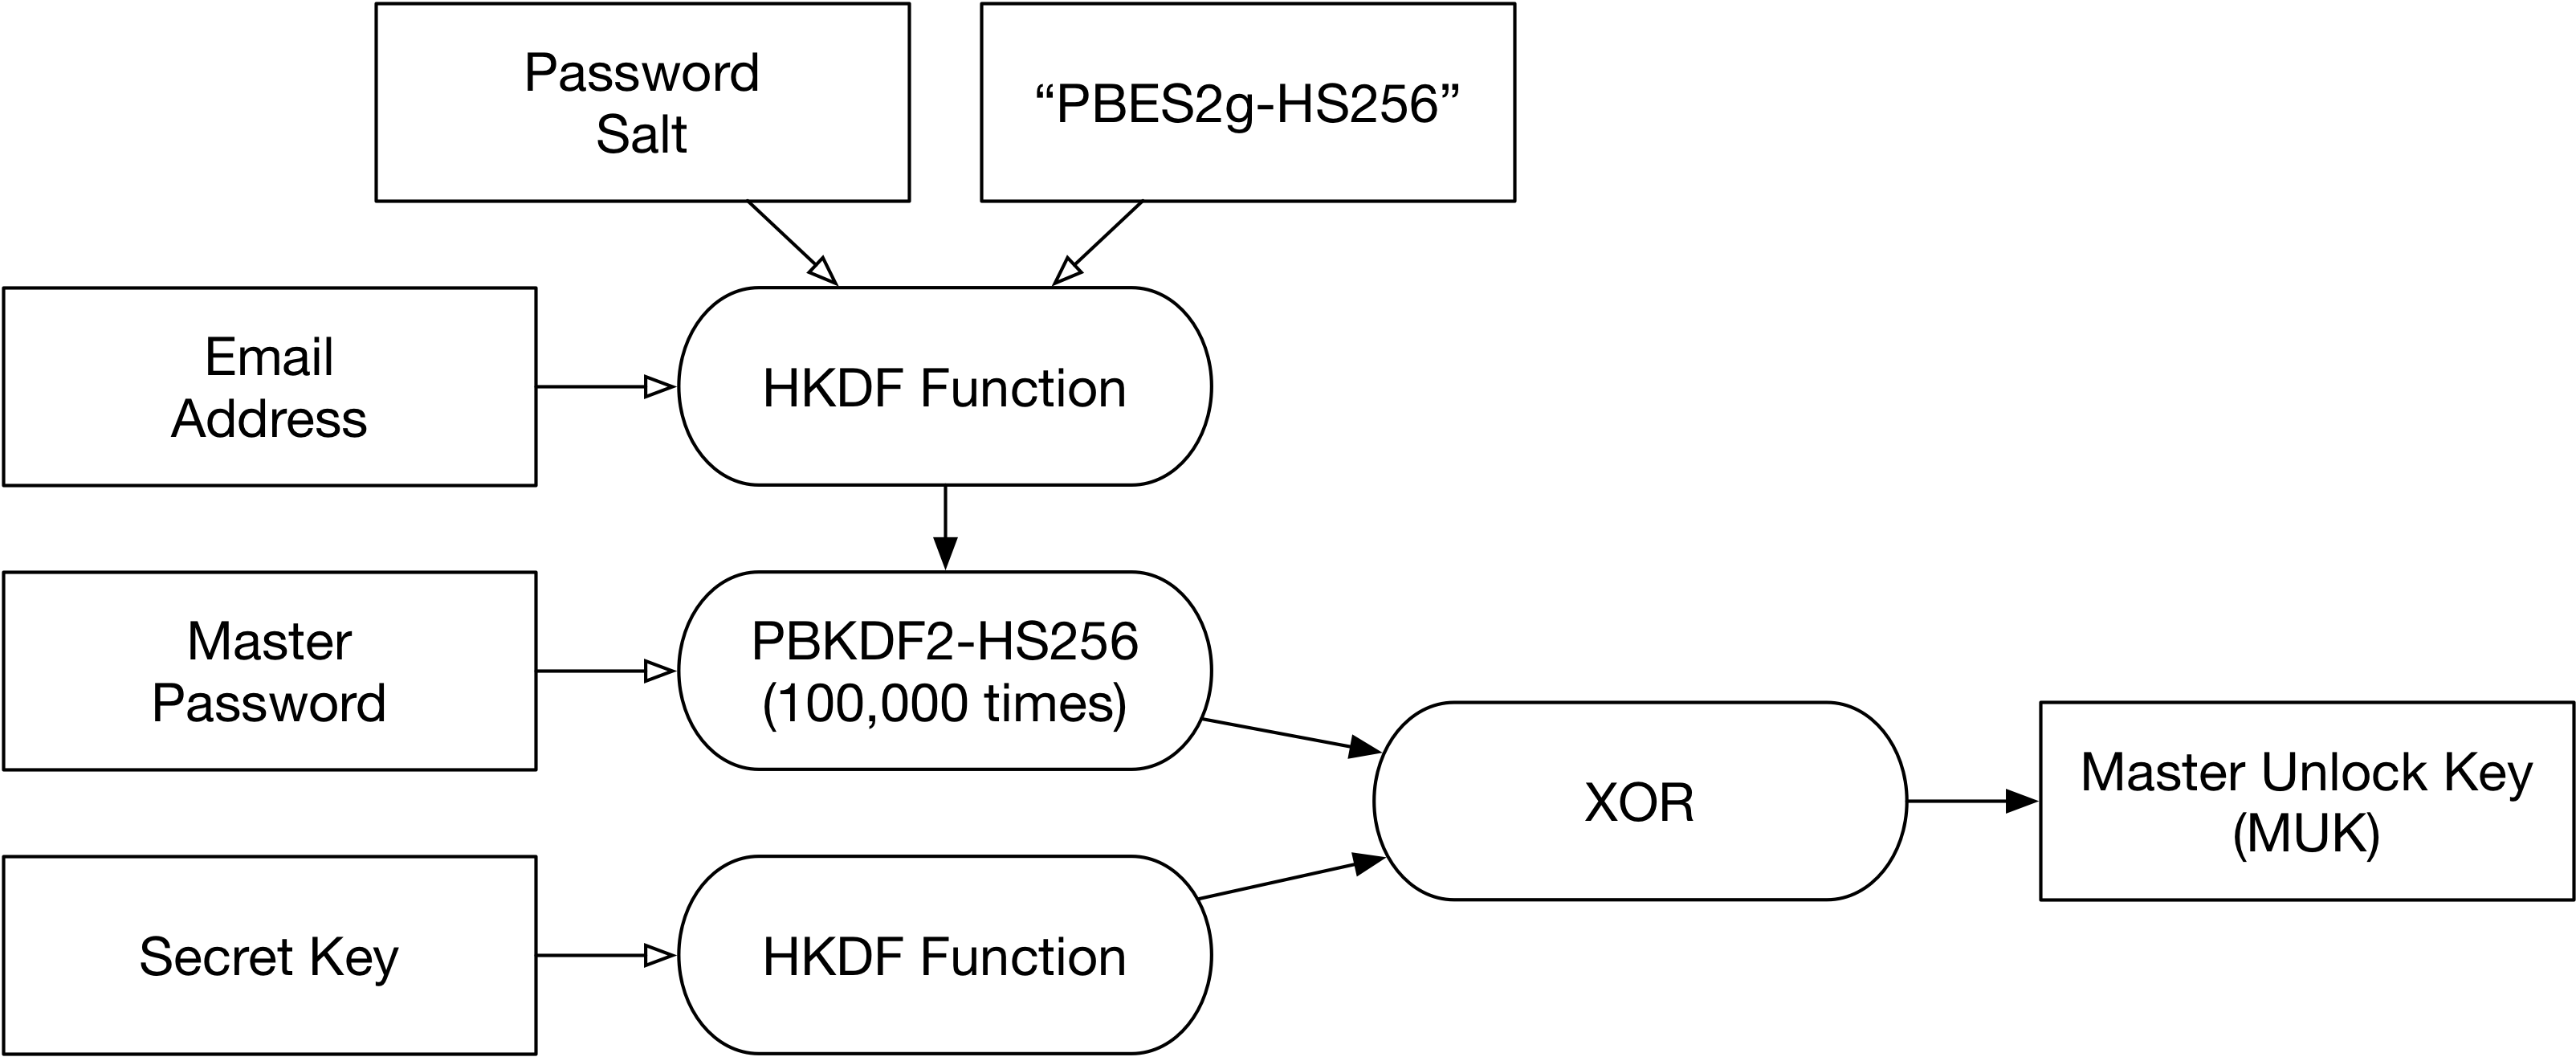
The initial salt is randomly generated when the account is created, and is stored on the server (and downloaded to the client). However, the salt isn’t used as-is. First, it is “entangled” with the user’s email address, to strongly bind the final key to the user’s email.
This binding happens using the HMAC Key Derivation Function (HKDF, RFC-5869). HKDF takes three parameters: key, salt, and info. In this usage, the “key” is the stored salt, while “salt” is the user’s email. The “info” parameter is supplied as “PBES2g-HS256”, which describes the specific algorithm in use. A change to any of these parameters changes the final salt, and thus the generated keys.
The password salt derived by HKDF is then used as the salt for the PBKDF2 function, which converts the user’s password into a 256-bit key. The function is called 100,000 times, but this iteration count is not hardcoded into the system, and can be changed as computation speeds increase.
Once the password has been stretched into a key, we need to mix in the Secret Key. This key actually has three components:

Secret Key
The Version and Account ID are known to the server. The Account ID helps to identify specific accounts. For example, if you call support, they can then verify “Is this for the account key that begins ‘A3-XBPH13’?” The rest of the key is not retained on the server. This is why you create an Emergency Recovery Kit when setting up the account (and should print it out and store it somewhere safe).
The secret portion ends up being 26 characters, drawn from a 31-character alphabet (A-Z + 0-9, but dropping 5 letters that look like numbers). The end result is a key with 31^26 possible combinations, or about 129 bits of entropy.
To mix in the secret key, it must first be converted into a 256-bit string to match the result of the last step. Again, we turn to HKDF, only this time the parameters are the secret, the account id, and the version. The 256-bit result of this HKDF function is then XORed with the PBKDF2 output to produce the final key.
Let’s build a MUK together
Again, here is the process:
- normalize email (accounting for Unicode, make lowercase, etc.) and Secret Key (make uppercase)
- derived_salt = HKDF(password_salt, email, “PBES2g-HS256”)
- derived_pass = PBKDF2_HMAC-SHA256(password, derived_salt, 100000)
- derived_skey = HKDF(secret, account_id, sk_version)
- final_key = xor(derived_pass, derived_key)
Visually:

2SKD Muk Process
The MUK is then used to begin the decryption process of the actual password vaults.
The various components of this process come from different locations. The email address is located in the accounts table, while the salt, algorithm, and iterations count come from the first entry in the keysets table, and the secret key is stored in the user’s macOS keychain. The master password is obviously typed in by the user, and ideally exists only in their memory.
** Computing 2SKD

Password             update-clown-squid-bedpost
Email                nobody@example.com
Secret Key           A3-ASWWYB-798JRY-LJVD4-23DC2-86TVM-H43EB
   Version           A3
   AcctID            ASWWYB
   Secret            798JRYLJVD423DC286TVMH43EB
Algorithm            PBES2g-HS256
Iterations (p2c)     100000
Salt (p2s)           cA4f6QY7wwUoclj74RMvUg==

Salt (decoded)       700e 1fe9 063b c305 2872 58fb e113 2f52

HKDF(ikm=p2s, len=32, salt=email, hash=SHA256, count=1, info=algorithm)

HKDF out: pass salt  ef4b 0bc3 81a6 87cf c6e3 c8bb d94f 6363
                     62bb ebf5 174f 417f 5d6b 5295 95b8 d533

PBKDF2(sha256, password, salt=HKDF_salt, iterations=p2c, 32 bytes)

Derived password key ff47 5c0e f6d7 c87b 11b5 84a4 02ab ae84
                     18f6 850e 8b90 4234 f396 2440 cd49 99d9

HKDF(ikm=secret, len=32, salt=AcctID, hash=SHA256, count=1, info=version)

HKDF out: secret key 1615 5981 c440 a00c 3c26 0aa9 5c14 8fbd
                     f11f 0602 dd11 d5af 477f 62d0 314f b23f

XOR PBKDF2 output and SecretKey HKDF output

Final 2SKD out       e952 058f 3297 6877 2d93 8e0d 5ebf 2139
                     e9e9 830c 5681 979b b4e9 4690 fc06 2be6
Base-64 Encoded      6VIFjzKXaHctk44NXr8hOenpgwxWgZebtOlGkPwGK-Y=
The example tools I use, as well as a complete set of test data for this blog post series, are available at this GitHub repository.
The same process is used to generate the SRP-X authenticator, but with a different salt and algorithm. The overall process looks like this:

2SKD for MUK and SRP-X
Vaults and Accounts
So this is what we use to decrypt the password items, right?
Not quite. The vault system itself is complicated and needs its own installment. We’ll just scratch the surface here, and focus on how that single Master Password can also unlock other accounts.
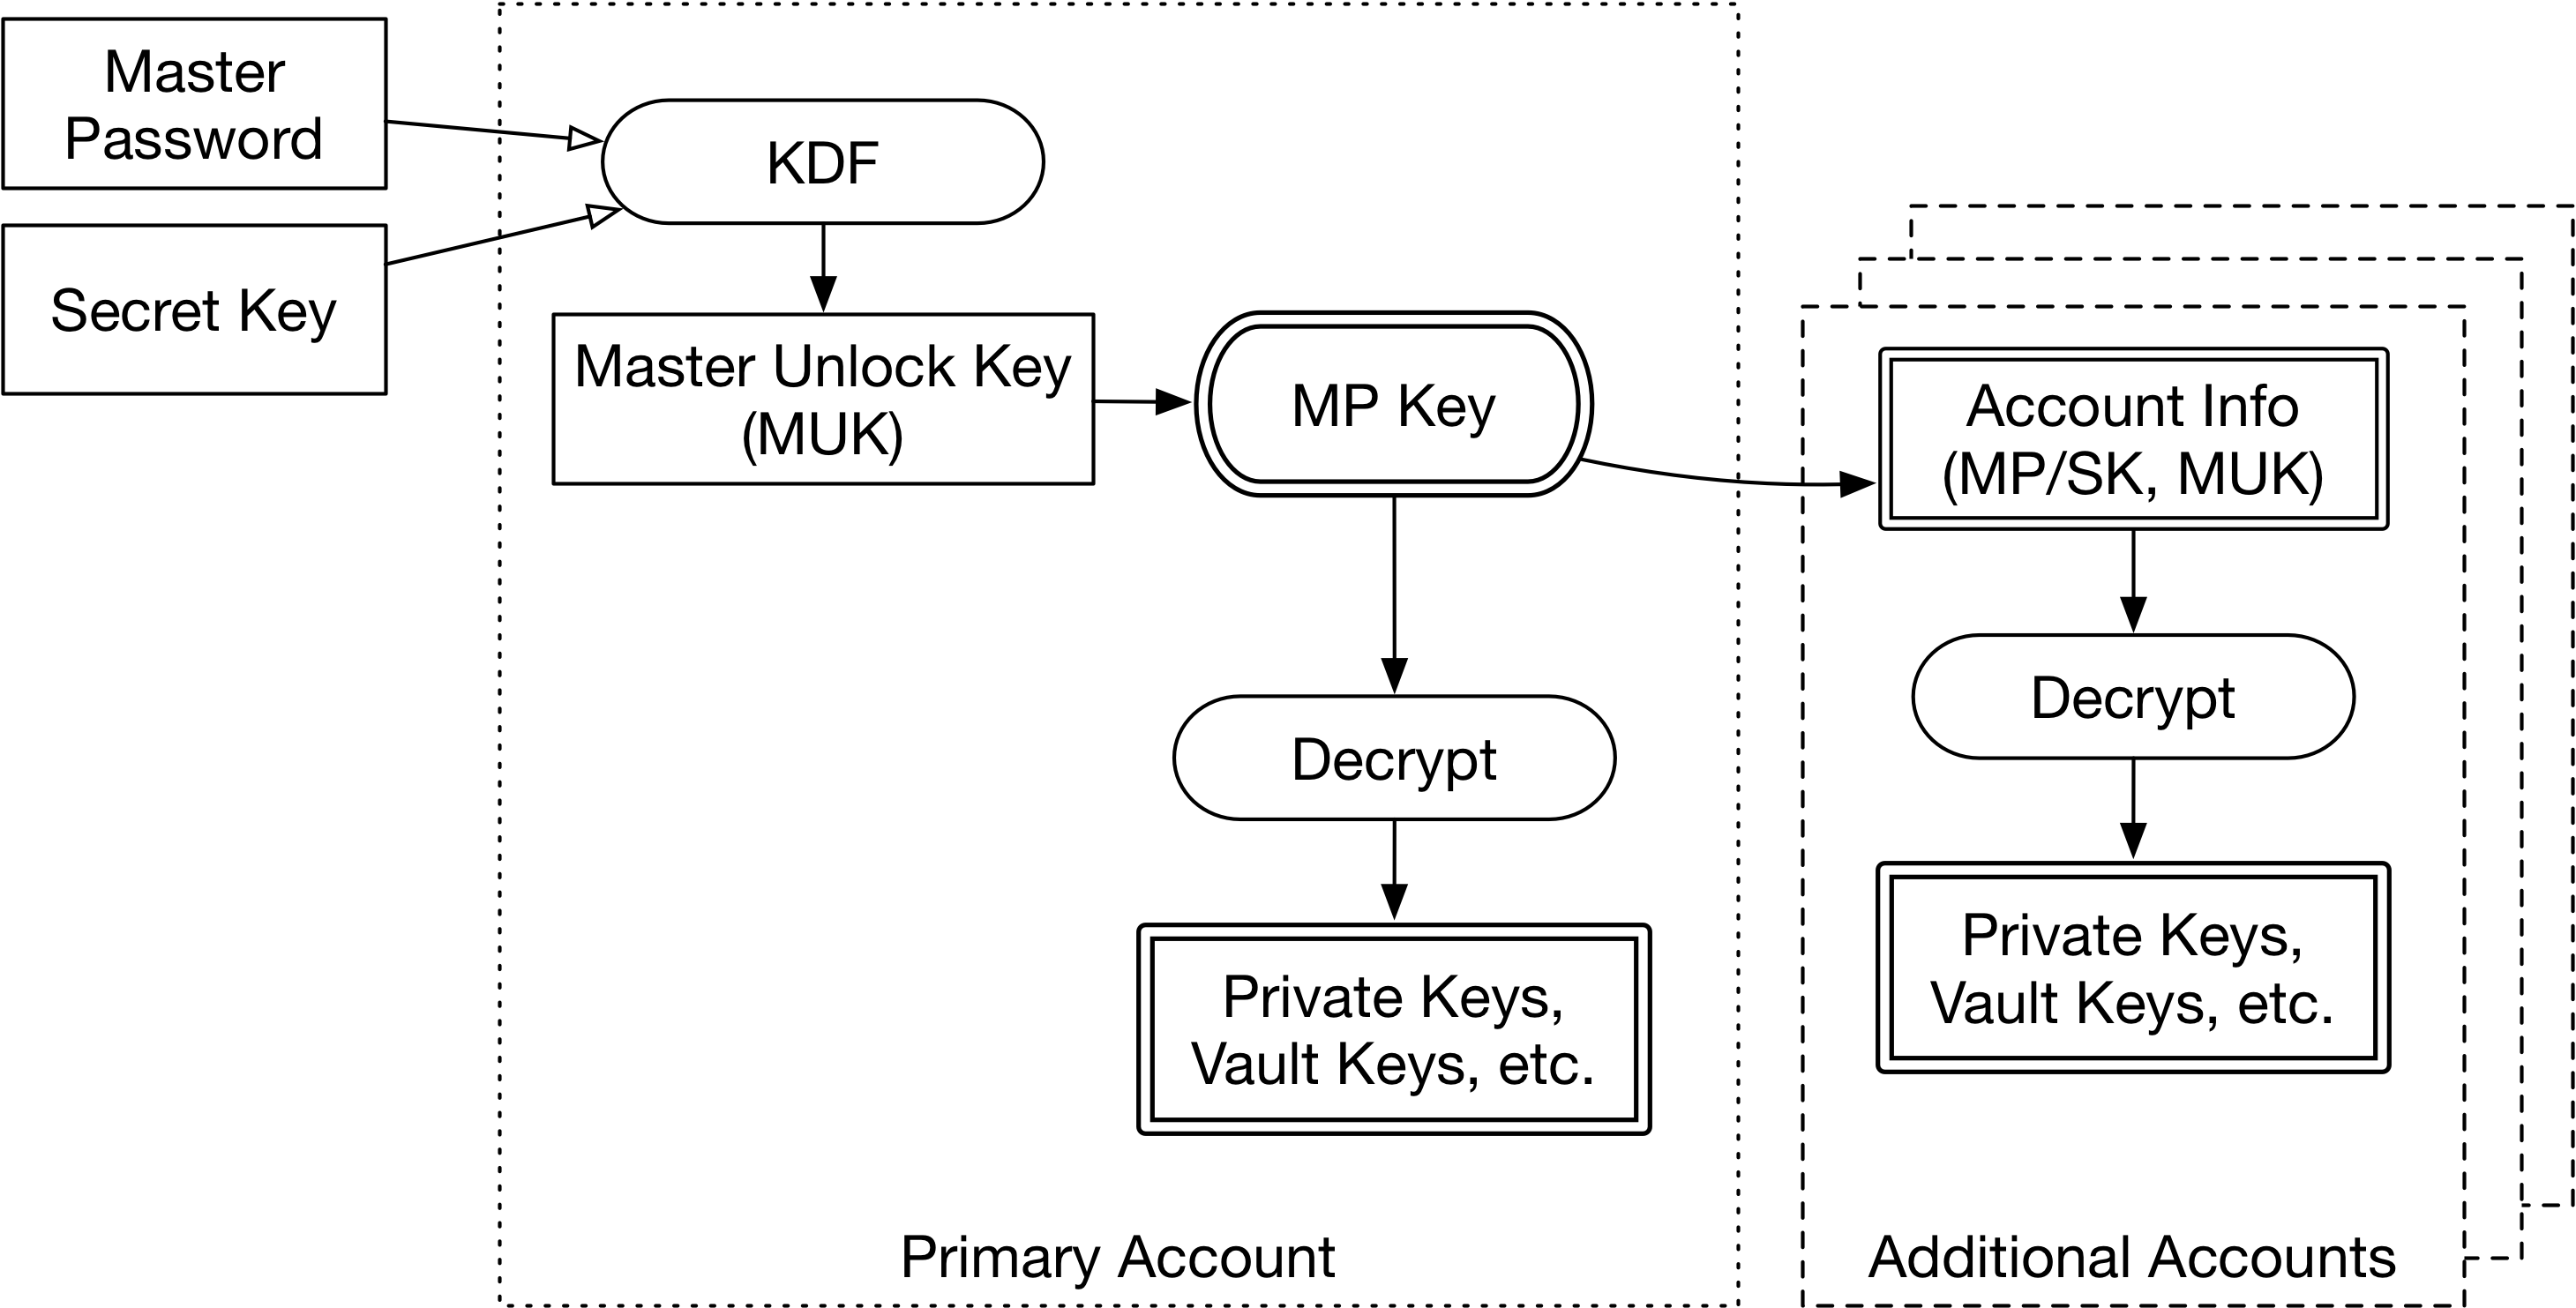
Each account includes multiple keysets – each of which is used to decrypt one or more vaults. If the client is connected to more than one account, there will be keysets for all the accounts. The “Primary Account” is the one whose Master Password unlocks the entire local client (and that’s basically the first account to appear in the accounts table).
The first keyset of the primary account includes an encrypted symmetric key “enc_sym_key” that looks something like this:
"enc_sym_key": {
    "enc": "A256GCM",
    "p2c": 100000,
    "alg": "PBES2g-HS256",
    "cty": "b5+jwk+json",
    "iv": "2FF8mtGD55z84h9jMtWAyQ==",
    "p2s": "cA4f6QY7wwUoclj74RMvUg==",
    "data": "8OjOA2NqUZZGxXD4r-z4QUfxjvuk23_i0DFAcYxx1r84hmsG1KV1G9iKBZd-kFpfzDgciJD3h8d91OT9D6F8KVqvdmx_q649mWEhiWwVcmRlKRVzgj-eZunS1XHxwHYDhvNvdzKUpNdAp7EKsQCRpiJJ3-eTndQBFMdyeCwkxnqMkuGW326P_mjW5yp_qYpGc4HgpY-_3aEhKimKVGJuxL4I5U5LU2ZFVNNhRIxkjJShtEwtXcTaVwH6",
    "kid": "mp"
},
This structure includes parameters for deriving the MUK using 2SKD: “p2s” (salt), “p2c” (iterations), and “alg” (the algorithm name). It also includes the Initialization Vector and ciphertext (“iv” and “data”) for the encrypted master key for this account (“mk” – this is different from the MUK). Finally, the “kid” is given as “mp”, meaning that this key was encrypted by the key derived from the master password, or the MUK.
Using the MUK derived earlier, we can now decode this encrypted master key:
Enter B64 encoded AES-256 key (final key from muk.py, for example)
 --> 6VIFjzKXaHctk44NXr8hOenpgwxWgZebtOlGkPwGK+Y=

Enter B64 encoded IV: 2FF8mtGD55z84h9jMtWAyQ==

Enter B64 encoded ciphertext (data field): 8OjOA2NqUZZGxXD4r-z4QUfxjvuk23_i0DFAcYxx1r84hmsG1KV1G9iKBZd-kFpfzDgciJD3h8d91OT9D6F8KVqvdmx_q649mWEhiWwVcmRlKRVzgj-eZunS1XHxwHYDhvNvdzKUpNdAp7EKsQCRpiJJ3-eTndQBFMdyeCwkxnqMkuGW326P_mjW5yp_qYpGc4HgpY-_3aEhKimKVGJuxL4I5U5LU2ZFVNNhRIxkjJShtEwtXcTaVwH6

{
    "alg": "A256GCM",
    "ext": true,
    "k": "Sco1rWpdmrLiAeZNtwAlCQsMMqN46AnyGasaMu3EqlQ=",
    "key_ops": [
        "decrypt",
        "encrypt"
    ],
    "kid": "qn8uimc4l7sofa26yivex24j7q",
    "kty": "oct"
}
The data field is encrypted using 256-bit AES GCM, with the last 16 bytes of the ciphertext being the GCM tag (which enables detection of a tampered ciphertext).
The master key decrypts the rest of this keyset, and also decrypts account information for other accounts. Though sometimes this key is referred to as “mk,” it is also identified by the kid in the decrypted result, in this case, “qn8uimc4l7sofa26yivex24j7q” (I’ll just abbreviate my example key IDs to the first four characters, like “qn8u”).
Each account configured in the client gets its own entry in the “accounts” table, and includes the field “enc_login”:
{
    "enc": "A256GCM",
    "data": "66z-_rQvwmcIw81fmDLTxre_AC_u5Pz3hGweiyN2LSpd-GvBoYz7Dd_kAzXGf4645bD_0jYi5EYr_Wh9c4OdRJEV_AruKSmk9VLyeksfzHtXN3UZRmieqSD6OlNMfrHWIzoByk2eoRxVAy5QbfyfA4MgJAo3BQ_0yLczlinbKPTCaw7L5VO9-YMypOViWaKWjhxh-D5q66RChkUhZgq58JAd1sYj696bDiyFyYUcTO1dHwHb1Mwn_NCCJ4gKcRFcHmvAjWQxi2Ttx_G6_a3QJpNvDhR6c2uwPn8jM61gCu3eKkmy5J4hadq7rjZfkwbcE0lSBK-kdJ2_kxY40cZjXhJw7bdihOfrMqjgJTBB82wXZnYANMyJsOHTF52TDmCgb9ZerE3wAnK8676EnciQNp_adrqjIwhdSM7LWf1Zo0ZhoJLa7DqF3OQ0C62tlnoIWf-C9uxHRMuooUFsS1M3mFnAFoLogqN_reCWEHTiVndI6HS99WfxE6Ruodx5MsobUm61CMr7jsqFSohKxo2R9RA59bQxQb-G4c9SAAoYuMK9hTQV71KyWgfr9UCw4DnXxfSgRLrRoDny9x-3vHxinQ7s4Ka84ZTN6ei4T6-iSbLnz1HIqdLw1lc=",
    "cty": "b5+jwk+json",
    "kid": "qn8uimc4l7sofa26yivex24j7q",
    "iv": "eaPYeKzI6X8xvRBonJ7Y2g=="
}
This structure is decrypted using the “qn8u” key from above, and contains the MUK, Secret Key, SRP-X password surrogate, and other such information:
$ python gcm_decrypt.py
Enter AES-256 key (hex or base-64 encoded)
 --> 49ca35ad6a5d9ab2e201e64db70025090b0c32a378e809f219ab1a32edc4aa54
Enter IV (hex or base-64): eaPYeKzI6X8xvRBonJ7Y2g
Enter ciphertext (hex or base-64): 66z-_rQvwmcIw81fmDLTxre_AC_u5Pz3hGweiyN2LSpd-GvBoYz7Dd_kAzXGf4645bD_0jYi5EYr_Wh9c4OdRJEV_AruKSmk9VLyeksfzHtXN3UZRmieqSD6OlNMfrHWIzoByk2eoRxVAy5QbfyfA4MgJAo3BQ_0yLczlinbKPTCaw7L5VO9-YMypOViWaKWjhxh-D5q66RChkUhZgq58JAd1sYj696bDiyFyYUcTO1dHwHb1Mwn_NCCJ4gKcRFcHmvAjWQxi2Ttx_G6_a3QJpNvDhR6c2uwPn8jM61gCu3eKkmy5J4hadq7rjZfkwbcE0lSBK-kdJ2_kxY40cZjXhJw7bdihOfrMqjgJTBB82wXZnYANMyJsOHTF52TDmCgb9ZerE3wAnK8676EnciQNp_adrqjIwhdSM7LWf1Zo0ZhoJLa7DqF3OQ0C62tlnoIWf-C9uxHRMuooUFsS1M3mFnAFoLogqN_reCWEHTiVndI6HS99WfxE6Ruodx5MsobUm61CMr7jsqFSohKxo2R9RA59bQxQb-G4c9SAAoYuMK9hTQV71KyWgfr9UCw4DnXxfSgRLrRoDny9x-3vHxinQ7s4Ka84ZTN6ei4T6-iSbLnz1HIqdLw1lc=

Output:

{
    "SRPComputedXDictionary": {
        "hexX": "QGvcdHIg4TifTEkps07s8wtbahetgMe2SkChdtfTaKA=",
        "params": {
            "alg": "PBES2g-HS256",
            "iterations": 100000,
            "method": "SRPg-4096",
            "salt": "OtQiDn4YnrTMoYXponFtfA=="
        }
    },
    "email": "nobody@example.com",
    "masterUnlockKey": {
        "alg": "A256GCM",
        "ext": true,
        "k": "6VIFjzKXaHctk44NXr8hOenpgwxWgZebtOlGkPwGK-Y=",
        "key": "oct",
        "key_ops": [
            "encrypt",
            "decrypt"
        ],
        "kid": "mp"
    },
    "personalKey": "A3-ASWWYB-798JRY-LJVD4-23DC2-86TVM-H43EB"
}
Why does it repeat the Master Unlock Key (here given as element “k”)? We’ve already used that and shouldn’t need it again…right?
Well, the MUK unlocked the first keyset for the primary account. But it can’t unlock the keysets for other accounts. If you have a second (or third or fourth) account enabled for this client, then you have to decrypt the enc_login data for each of those accounts, using mk (“qn8u”) for each of them. Once you’ve done that, then you’ll have the MUK for those accounts, and can decrypt their first keyset.
Overall Unlock Process on macOS
So the basic unlock process looks like this:
- Retrieve the Secret Key from the system keychain, and email from the accounts table
- Look up the 1st entry for the 1st account in the keysets table
- Retrieve salt, iterations, and algorithm from that entry
- Prompt user for Master Password
- Perform 2KSD to generate MUK
- Use MUK to decrypt the master key (1st keyset entry)
- Use mk to decrypt account data for other accounts
- Retrieve the MUK for these other accounts
- Decrypt 1st keyset entry for each of these accounts in turn
Now we have the mk for all accounts, and can descend into the vaults.

Multiple Accounts on macOS Clients
What are we missing?
So this is how you go from a locked 1Password client on the Mac, to being able to access all the data for multiple 1Password cloud accounts. We use two key derivation functions (HKDF and PBKDF2), with account-specific parameters (under-the-hood things like salt and iterations, secret data like the Secret Key and Master Password, and also the account’s email address). The result of this derivation decrypts the primary account, which decrypts other accounts.
Next time: Unlocking the Windows client

